Stop! You’ll damage your deck if you don’t know these 2 basic sanding techniques!
If you’re going to sand your deck, then you need to read this very important message before you do any irreversible damage…
Here’s what you need to know…
If you just blindly sand your deck without following some basic rules, you could end up with a deck that looks like this once it’s been stained…
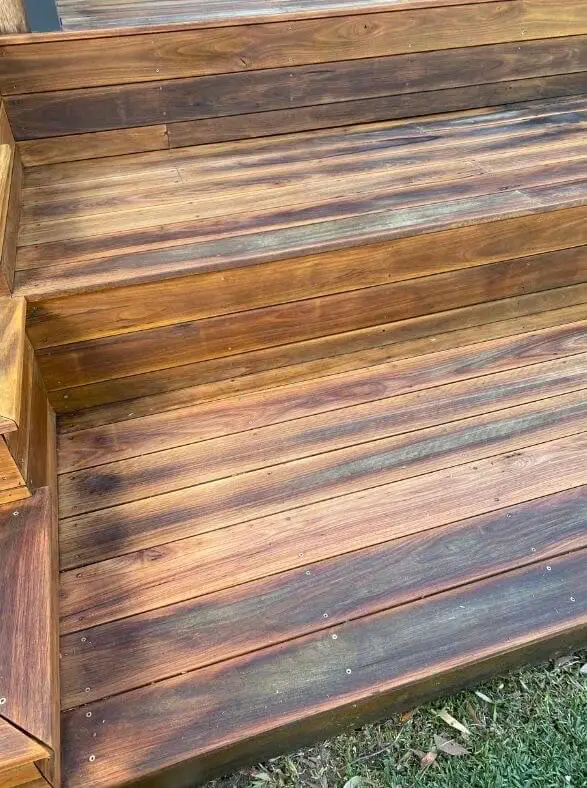
Do you have any idea what caused these blotchy marks?
I do…
And if you stick with me, I’ll make sure you never make this deck sanding mistake…
You see, this blotchy decking above was sanded with a huge floor sander…
Kinda like this one here…

Now the problem with floor sander like this is that if you have any type of movement with your deck boards and they don’t sit completely flat, this sander can’t sand the entire surface of your boards properly…
And believe me when I say…
Most decks have some level of cupping or movement that makes them uneven…
Yes, even yours…
Think about it…
Your deck is exposed to the weather each and every day…
One day the rain beats down on it, soaking it and causing it to swell…
Then the next day the sun blasts down on it and causes it to shrink and dry out…
This constant swelling and shrinking from the weather will always lead to cupping and movement of your deck boards…
Look, you may think that your deck is flat…
Heck, your deck could look flat…
But the moment you run a giant floor sander over your deck, you’ll soon realise just how “Not Flat” your deck really is…
The moment you start to sand your deck, the higher sections of your deck boards will stop the sander from reaching the lower sections of your boards…
At first glance it looks like it has, but once you stain it, your mistakes are highlighted by the stain and put on display for everyone to see…
Have a look at this deck here…
Do you notice how the middle sections of the boards are a cloudy, black, blotchy mess but the outer sections of the boards are clean and bright?
That’s because the boards are slightly cupped so the floor sander couldn’t sand the middle sections of the boards…
Now, these boards look flat, right?
But the mere fact that the sander couldn’t sand the middle of the board is proof that they are anything but flat…
The thing is, deck stains weren’t designed to hide your deck but to enhance its natural features…
If you can’t remove all of the old stain or years of damage to your deck, once you stain it, it’ll be highlighted and enhanced, not covered and hidden…
Does that make sense?
So that’s what happens when you sand your deck with a drum sander…
If you want to sand your deck with a drum sander you need to grind in down to level it off…
You do this by putting on a really coarse sandpaper and sanding across the boards first…
When you do this you could be taking off 3mm to 5mm off your decking boards…
Then you have to sand up and down the boards to remove the grinding and etch marks you just gauged into your deck…
No big deal right?
You want your deck to be flat don’t you??
Well, most deck boards are only 19mm thick…
Then you go and take 5 mm off the top and reduce it to 14mm…
How strong do you think your deck will be after this abuse?
I know the “Deck-Spurts” all use the gigantic floor sander to sand decks…
I know they do…
But here’s the thing…
Deck pros are running a business and they want their business to be as profitable as possible while doing the least amount of work…
That’s their aim…
Their aim isn’t to do the best job on your deck, to protect your deck from damage and make sure you get your money’s worth…
You’d think it would be but it isn’t….
Do you know how I know this?
Well firstly, these deck guys all use floor sanders even though they know full well that a floor sander will sand too much off your deck, which makes their job easier but it’s making your deck weak and flimsy…
And secondly, whenever these guys sand and stain a deck, they never tell you that you can only sand your deck with a floor sander twice before it becomes too thin and unsafe to walk on…
It’s true!
The only reason the Deck companies use floor sanders is because it makes them more money…
The only reason to use a floor sander is to maximise profits…
If your deck gets weakened and needs to be replaced in 2 years time, that‘s your problem…
They’ve already made their money…
You know what?
That same deck pro who butchered your deck could probably give you a quote to tear it down and build a new one as well…
So it’s a win-win for him…
But not all Deck-Spurts are like this…
There’s a few out there who shun the use of a drum sander on a deck…
These guys can see the damage that they do, so they choose to go in a less destructive sanding method…
Instead they recommend using an orbital floor sander…
The thing is…
Orbital Floor Sanders are useless when it comes to sanding a deck…
I know that most woodworking experts recommend using an Orbital Floor sander to sand your deck…
Like this one here…

The idea is that the pad on the sander is flexible so it can reach those lower spots on your uneven deck boards…
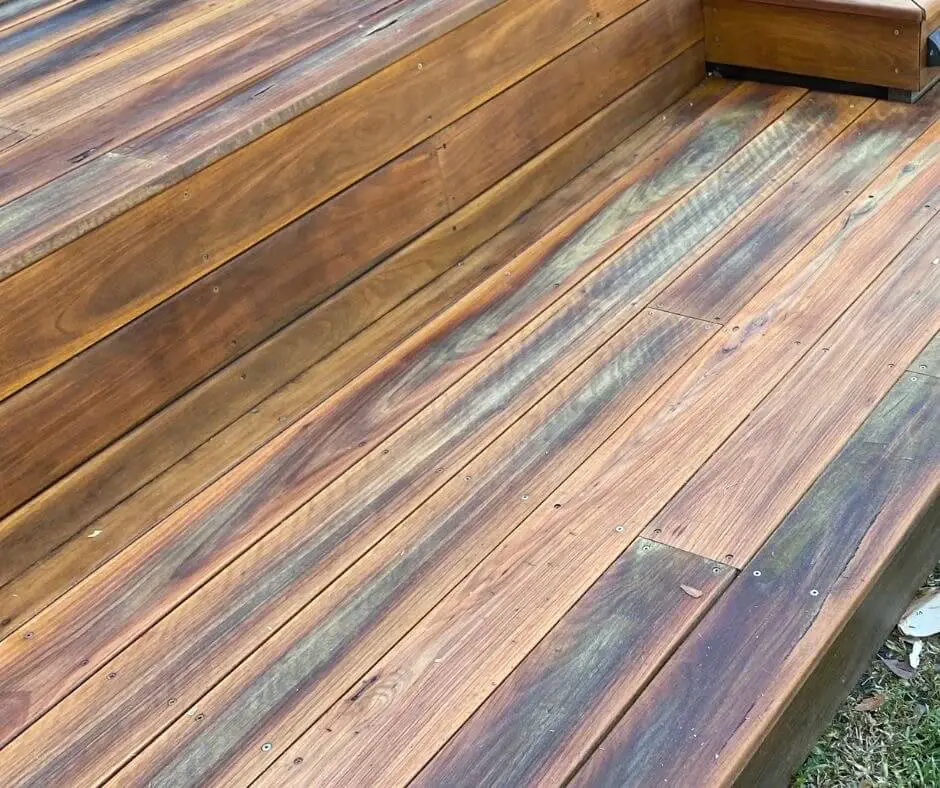
Ok, this is the result of an orbital floor sander on a weathered deck…
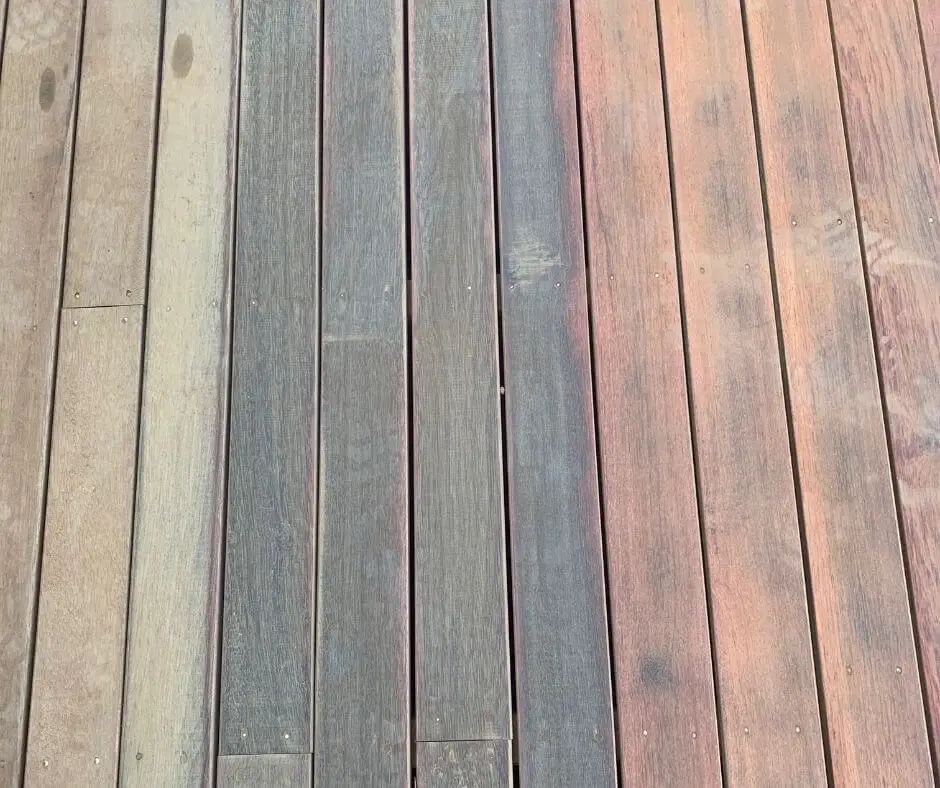
The section on the right is before sanding…
The blackened middle section is after sanding with the orbital sander…
And the pink section has been sanded with a belt sander…
What I’ve found with an orbital floor sander is that it will remove an old deck stain that is in good condition…
You know those sections that are undercover and protected from the weather?
Yep, these sections sand off like a dream…
But the moment you have any type of weathering to your coating, this sander is useless…
Well, it’s useless if you want it done properly…
It kinda buffs the old worn sections instead of removing them…
So this type of sander is useless for deck sanding if you plan on stripping your deck back to bare wood…
If you want your deck to be sanded back, to look brand new, then you need a different type of sander…
And that’s what I’m about to show you right now…
To sand a deck properly, you need to use a belt sander…
I know, I know…
A belt sander is so small and it will take forever to use one of those…
If you have concerns about using a belt sander, I’ve got a brilliant way to use a belt sander that won’t break your back…
It will cut your back breaking work down by as much as 80%…
But before I get to that,
The thing that makes a belt sander so great is that it is smaller than the big floor sanders so it makes it possible to sand those lower sections that the larger sander can’t reach…
Because it’s smaller, you can get into those lower sections without having to completely grind down the higher sections of your deck…
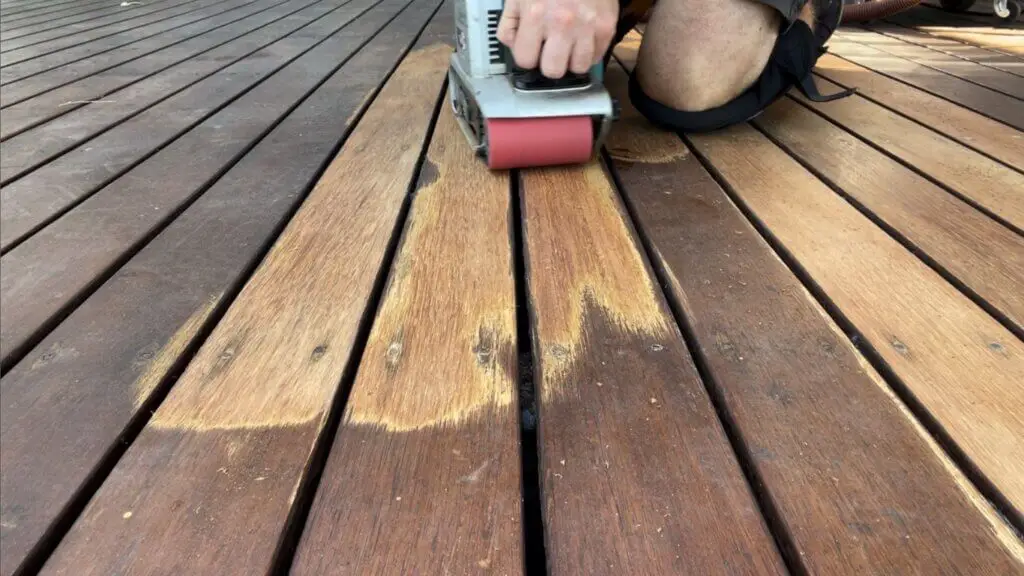
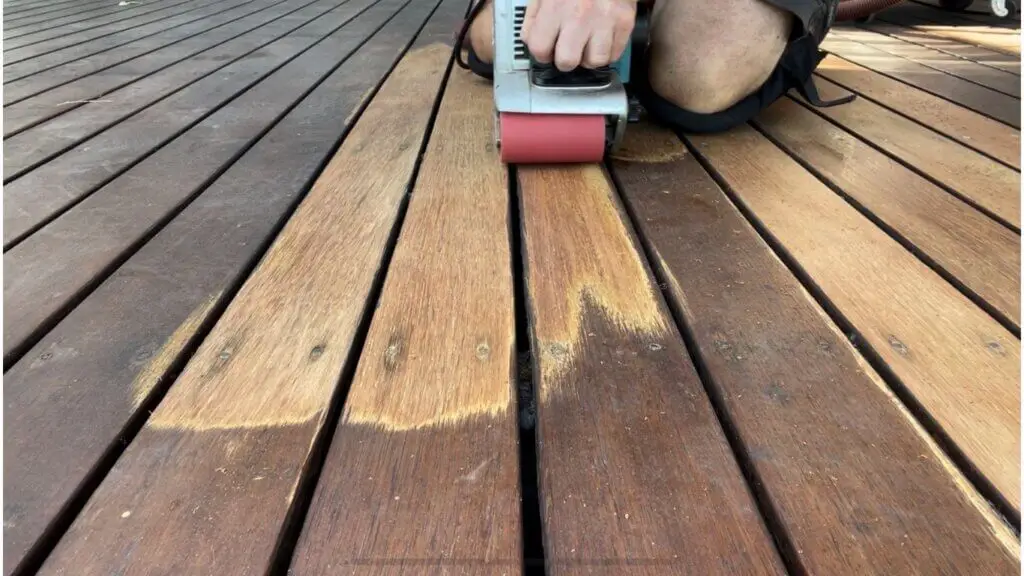
Look how clean this timber deck is with the use of a belt sander…
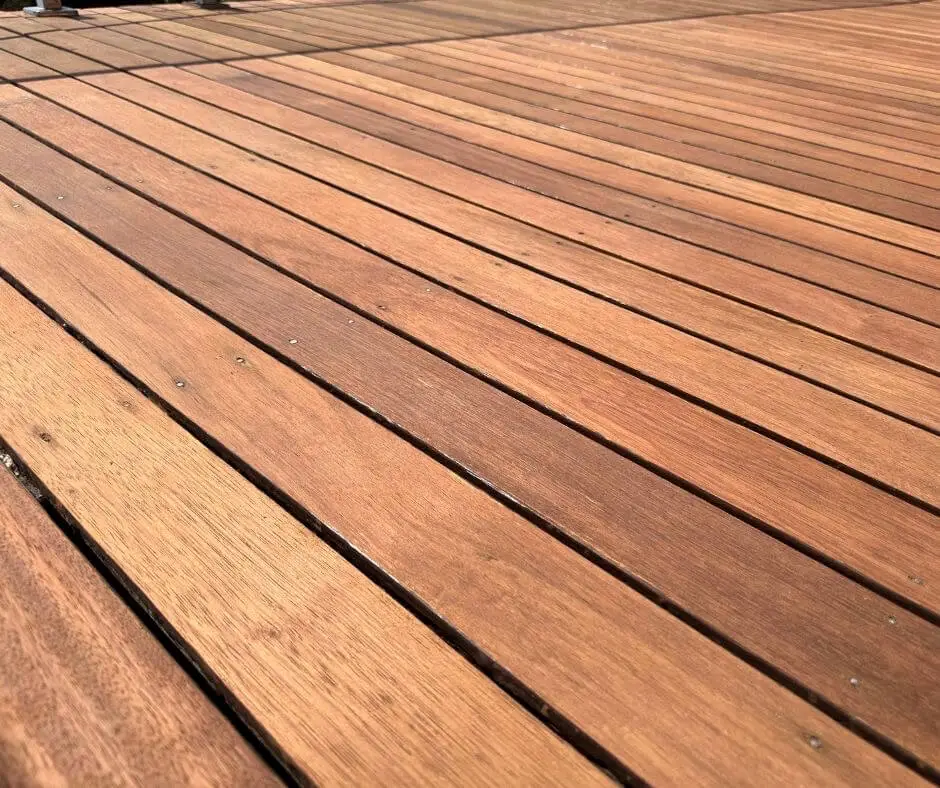
This is exactly how you want your deck to look after sanding…
Now I know the reason most people don’t like to use a belt sander is because of the work that’s involved…
I get it…
It’s a lot of work and it’s a smaller sander so it takes longer to sand your deck and it hurts like crazy…
It’s true, sanding a large deck with a belt sander is like some type of mediaeval torture…
For a smaller deck it’s fine, but for anything over 30m2 you’re going to be hating life…
But, the truth is, a belt sander will give you the best results…
Believe me…
If you want a clean fresh deck timber that looks brand new, then you need to use a belt sander to sand it back…
I think now would be a great time to show you one of the easiest ways on your body to sand a deck with a belt sander…
It’s my “oh so brilliant sanding method” that will cut your sanding time down by as much as 80%…
You still get all of the benefits of using a belt sander but you won’t spend all of those gruelling hours hunched up behind a belt sander wishing you had made some better life choices…
Are you ready for this?
If you want to spend a lot less time behind a belt sander this is what you need to know…
Well, there’s 3 steps to this…
- Hire yourself a drum sander…
- Sand your deck poorly but remove 70% of the coating…
- Remove the remaining 30% with a belt sander…
Hold on!
I know I said that a drum sander will completely destroy your deck and know I’m suggesting you use one on your deck…
But the difference with my method is that you skip the levelling part of the sanding process and just sand up and down the boards instead of across…
So you won’t be thinning and weakening your deck boards like the “Pro’s” do…
Then those sections that couldn’t be reached by the floor sander, you simply sand off with the belt sander…
It’s that simple…
Ok, it’s still hard work but you want the job done properly, right?
This 3 step process will give you the barest, most stripped back timber known to man, but only at a fraction of the back braking, knee aching work…
Genius right?
Well, it’s clever at least…
Anyway, whether you choose to employ my very, very, veeerrry clever floor sander, belt sander combination or you choose to sand your entire deck with the belt sander, there’s a problem that most people run into…
And that is…
The “best practices” and “must use techniques” of using a belt sander are completely wrong when it comes to sanding a deck…
They say that you MUST keep the belt sander flat at all times and let the sander do all the work…
You must simply hold it, keep it level and let it do its magic…
Let me explain something to you…
This is the real world and sometimes people say things that they THINK are correct but they don’t have enough experience to know better…
I’m not saying that these Internet “Experts” are lying to you, all I’m saying is that they clearly don’t sand decks for a living…
They may have done a favour for their brother in law Barry, and sanded his deck back…
Now they think they know how to use a belt sander on a deck…
But if you have come across a video showing you how to use a belt sander to sand your deck, you need to hear this…
The way they show you how to use a belt sander in a workshop won’t work on a deck that has been exposed to the elements…
In a workshop, everything is perfect…
Perfect lengths of timber…
Everything is nice and flat…
So the idea of keeping the belt sander flat and letting the sander do all of the work is spot on…
But out in the dark and dirty world of a worn and weathered deck, things can get ugly…
Your deck has been through the wars…
You’ve abused it and treated it like a savage so now you’re working with a completely different beast…
Your deck is no longer that refined, straight laced timber you once knew…
No, you put an end to that didn’t you?
The last couple years with you, your deck has twisted, buckled and morphed into an uneven version of its former self…
If you get down on your deck in an attempt to sand it, and you try keeping the belt sander flat while running it up and down the boards, then let me tell you something…
It ain’t gonna cut it!!
Try it, you’ll see…
Some spots just won’t come off…
Don’t even consider letting the sander do all the work…
If you do, the work will never get done…
That’s as crazy as leaving a sink full of dishes and hoping your kids will put them in the dishwasher without you telling them to…
Bahhh!!
You’re dreaming…
We both know you need to give those little kiddies specific directions and keep on them at all times…
And so it is with a belt sander…
You need to grab that little sucker by the neck and hold it tight…
No, not the kids…
I’m talking about the belt sander, keep up…
Come to think of it, this technique could also work with your kids…
Just something to think about…
Anyway, you have to stay on top of it and give it a little bit of pressure…
But a word of warning…
If you think that you can push down really, really hard, to get those stubborn spots, think again…
Have you ever seen a timber divot?
The best way to describe it is a hole or crater in the surface of your deck boards from where the belt sander has been used too aggressively and it has chewed very smooth chunks out of your decking boards…
If you have any timber divots, you’ll never be able to show your face in public again…
A little dramatic, maybe…
But you’ll be embarrassed to let anyone see your deck after you’ve butchered it with your belt sander…
Ah, but you’re not stupid are you?
You know better than that, don’t you??
Even a fool knows that you must always keep the belt sander flat, right???
No! Were you not listening??
I feel like we’re going around in circles!
You can’t keep the belt sander flat, it won’t work…
Look, when it comes to sanding a deck with a belt sander, you need to throw the rule book out the window…
Ya hear me?
Tear it up!
Burn it!!
Do whatever you need to do, but don’t follow it…
Here’s what to do instead…
You need to combine my tried and tested “RoundHouse Method” so you don’t burn divots all over your deck and then you need to combine this with my very special “High Skii Technique” so you can get into all of the high and low spots without grinding your decking boards paper thin…
It’s the same combination that I use day in and day out in my deck sanding business…
Yep, I use a belt sander and not a floor sander…
I get down and do the hard work everyday…
Sure I could use a floor sander and make it easier on myself but I use a belt sander because it’s the best way to sand a deck back to bare timber and not damage and weaken the boards…
But if you’re going to use a belt sander, there’s something you need to know…
If you want your deck to be sanded properly without the damaging effects of thinning and weakening your deck boards…
If you want to remove all of the old stain so your deck will look brand new…
If you want to sand your deck back to bare timber without chewing off all the heads of your deck screws…
And if you want to make sure that your new deck coating can absorb into the timber and not merely sit on top of your old coating, waiting to peel off…
Then you really need to know how to move and manipulate the belt sander so you can sand your deck properly…
It’s actually really easy once you know the techniques…
The great news is, there’s only two techniques…
Yep, only two really basic sanding techniques that anyone can do…
They’re not complex at all…
All you need is to be shown how and you can do them…
Ok, so the first technique is my “RoundHouse Method”…
This method is the only way to get into those low spots that your sander just can’t seem to remove…
If you have cupping, this is the technique you need…
Come to think of it, I use the RoundHouse Method along the entire board even if there aren’t any low spots or cupping…
I find it actually helps remove the deck stain quicker even on flat, even boards…
It’s hard to explain, you’ll need to see it in action to really get it…
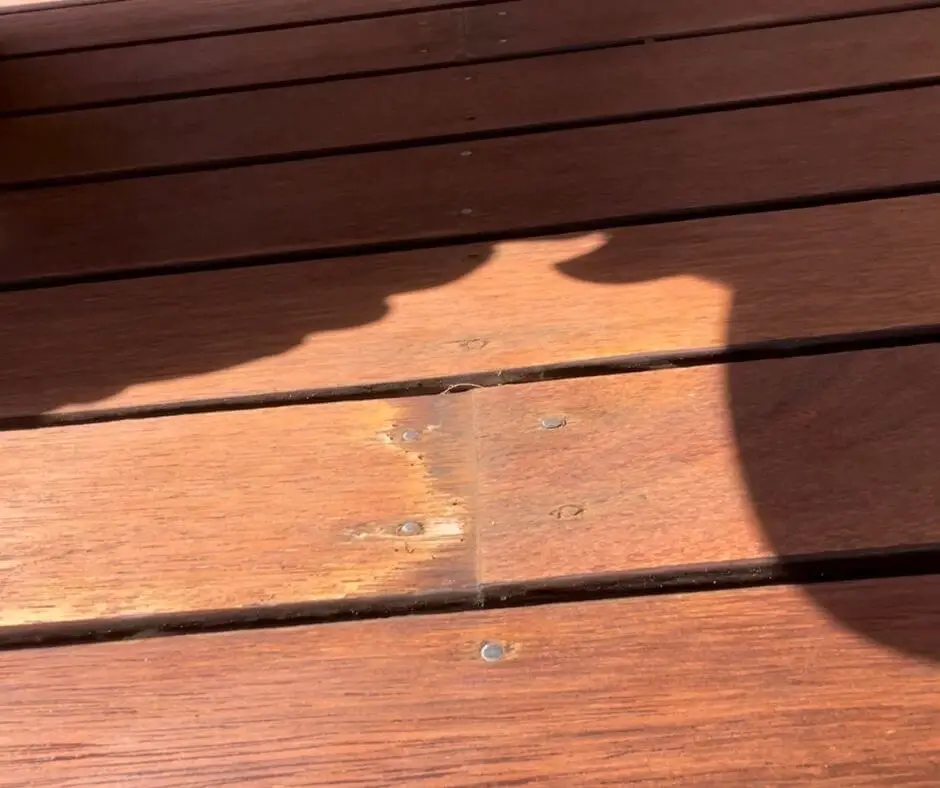
What you need to know is, at certain points your belt sander won’t take off the old coating on your deck…
Check this out…
This is a deck I recently sanded back…
Then this little spot reared its ugly head…
I’m sanding it over and over and over at that same spot and that old coating just won’t budge…
You can see it in this video…
Now be careful, because if you keep going in that spot, you’ll burn the timber and leave black marks on the surface of your deck…
So instead of burning the timber by trying to get a low spot, you simply pull the Roundhouse Technique” out of your back pocket and in a matter of seconds…
Those spots that wouldn’t seem to budge, disappear like magic…
No burn marks, no etch marks, no divots gouged into your timber…
And most importantly, no old stain…
I achieved this with my RoundHouse Method…
Well actually, it was the RoundHouse Method used with The High Skii Technique…
Let me tell you about my infamous, “High Skii Technique”…
These 2 techniques work together to sand any type of cupped, warped out of shape, deceivingly uneven deck you can throw at it…
But let me focus on the High Skii Technique for a brief second…
Now this technique was designed to get at those low spots like the one I showed you above…
But it’s also perfect for these spots here…
You need to be careful at these sections, because they hold your deck boards down in place…
If you sand them down too much, you’ll either make them weak points for water rot or you’ll chew the heads right off your deck nails…
That’s why, at these uneven sections, I use the High Skii Method…
This flies in the face of all those “Keep it flat” deck gurus…
If they catch you using this technique they’ll have a fit…
But don’t worry about what they think because they’re completely wrong…
You see, at the point where a low board butts up against a higher board, if you try to sand it the conventional way, you’ll etch belt marks all across your deck boards…
When you use my “High Skii Technique” you’ll be able to sand into any uneven deck board without causing any damage whatsoever…
But the real magic is when you combine the “Round House Technique” with the High Skii Technique” and use them at the same time…
It’s a match made in heaven…
It’s such a beautiful thing….
Like poetry in motion…
Wait till you see it…
I have to admit one thing though…
One of the problems I see with my super special belt sander techniques is that they are too simple and easy to do…
I’m serious…
Because they’re so simple, I’ve seen something really weird happen when I’ve trained people on these techniques in the past…
The thing is, they are brilliant but actually quite underwhelming once you see them for yourself…
A lot of people think…
“Arrh, that’s way too basic, that can’t be the secret techniques”…
Then the moment I leave them to their own devices, they start doing their own version of the techniques because they think it will make it better…
And they never make it better…
No, it’s the complete opposite…
They leave little spots on the deck that they can’t seem to get off…
All because they didn’t think these basic techniques could be the secret sauce…
It’s true, it happens to me all the time…
I’ve even had to fire staff in my decking business because they just couldn’t see how such basic techniques could make any difference to the finished deck…
So they would ignore the easy step by step method I lay out for them and they end up destroying some poor customers’ deck…
But for the ones who listen and follow my techniques, well they soon see how effective MY techniques are and they use them every time after that…
Listen to me very closely…
These methods are sooo easy that anyone can do them…
But don’t let that fool you…
These methods are truly the best way to sand a deck with a belt sander and once you see how to do them, and then you actually use them on your deck, you’ll have the cleanest and freshest looking deck you could ever hope for…
Your deck will look like it was just installed…
It will look brand new…
It’s like bumping into an old friend from years ago and they haven’t aged a day…
And you’re there thinking, “How do they still look so young and fresh faced?”
Yep, you guessed it…
They used the Round House Method and the High Skii Technique to take off years of abuse and heartache…
Anyway, it’s the best way to make an old deck look brand new again is all I’m saying…
Plus, you’ll feel proud of yourself knowing that you did such a great job…
Look, these techniques work and they are simple…
Once you know how to do them, that is…
If you want to see these techniques for yourself and you wanna know the easiest and safest way to use them so you don’t completely destroy your deck, then I have something you’re gonna love…
I’ve filmed myself using these techniques and I talk you through the little pitfalls you need to look out for…
I’ll take you by the hand and show you exactly how to do the techniques and when to use them…
I’ve put all of the deck sanding techniques into an ebook that links out to videos of me actually using the techniques…
I show you pictures and then break it down for you in the ebook, then I link out to videos of me doing it so you can see it in action…
Some people like to read and some people like to watch videos, so I decided to give you the best of both worlds…
Sound good?
Ok, great…
You can get your grubby little hands on my most treasured deck sanding secrets for whatever you can afford…
All you need to do is select the amount you’re willing to pay and I’ll give it to you for that price…
I’ve been selling this guide for $30 but if that’s a little too spicy for you, for a limited time you can grab it for $20…
Until I come to my sensors and put this guide up to $40…
Yup…
Years of hard earned knowledge of being in the trenches, day in and day out…
Oh my gosh, I had to learn this all the hard way…
Stumble and fall…
Mistake after mistake…
And now you can get it all just downloaded into your brain for only $20…
I must be crazy…
Actually, I don’t think I want to show you this any more…
It’s not fair…
You need to do your time and make a ton of mistakes on your deck…
That’s how it should be…
Oh, who am I kidding…
I really want your money…
So scroll down to the bottom of this page right now and steal all of my deck sanding secrets…
This hurts my soul…
Quick, go there now and steal them before I change my mind…
Hurry while I’m not looking…
Go on then…
Hey, uuhhmm…
You’re still here reading?
Ok, let me tell you something…
Don’t for a second think you can’t do this…
I’ve taught this to alcoholics and they found it a cinch…
I’ve taught this to potheads and while they were ultra slow and chilled, they found it easy and no stress…
Heck, I’ve even taught these techniques to gentlemen in their 60’s and as it turns out, they were quicker and more capable than the potheads…
Who woulda thought?
I’ve even walked a lady in her 70’s through this via email and she got it done with no hassles…
It did hurt the body a little bit, but we sanded in smaller sections at a time to reduce the pain…
Her family told her she was to old and that she should leave it to the professionals…
Boy were they wrong!!
Anyway…
Don’t think that because you’re out of shape or “other people” think that you’re too old and decrepit that you can’t do this…
Let me tell you something…
I trained a tiny little 5 foot Accountant in a business suit…
Riddled with arthritic knees, and a bad attitude, how to sand a deck, from start to finish, using these methods…
And she picked it up within 5 minutes and never looked back…
An Accountant! Can you believe it?
Never worked with her hands a day in her life and now she’s a fully fledged deck sanding expert…
The point is, you don’t need to be a tradesman to use my techniques…
In fact, you’ll be better off if you don’t have any trade background…
Most tradesmen who see my techniques, think that they are way too simple and basic so they try to get all fancy, let their pride get in the way and they change my methods…
Because they know better…
Then all they do is mess it up and need me to fix it for them…
So, if you have no experience, you’re right where you need to be to learn these basic techniques…
Don’t you think you should be scrolling to the bottom and filling in your details?
Well, go on…
What are you waiting for??
If you were to pay someone to sand your deck for you, you’re looking at a minimum of $1850…
That’s the minimum charge that most professional deck restorers charge to work on your deck…
And that’s just a starting point…
If you call me for a 50m2 deck it will cost you around $4500.00…
And that’s why you want to do it yourself isn’t it?
You don’t want to pay those crazy inflated prices that me and my peers charge??
Well, $20 is a small price to pay to make sure you do it properly…
It’s a small investment to make sure you don’t mess this up…
Let me assure you, once I show you “The RoundHouse Method” and “The High Skii Sanding Technique ”, you’ll know exactly how to do them…
You’ll see how simple they really are…
Look, if for any reason you don’t like my training, simply send me an email and say that you want your money back and I’ll put the money back into your account…
You can keep the training for 30 days, look at it, study it and try it out…
But if you think it sucks or you just think that you can’t do it, I’ll definitely give you back your money…
I put this training together to help you get this right, so if the training doesn’t work for you, I don’t deserve your money…
Sound fair?
So you can purchase stress free knowing that I won’t keep your money if you don’t want me to have it…
It’s ok, I’ll just take the food right out of my daughter’s mouth…
Right as she’s about to take a bite…
“Sorry sweetie we can’t eat this week, they want their money back”…
Snatch!!
Rest assured that once I pry the pork chop out of my daughter’s hand, you can get your money back…
No questions asked…
But be warned…
If you ask for a refund, something bad will happen that you will have no control over…
There will be tears…
Lots and lots of tears…
Anyhoo…
Click the button below, enter your details and I’ll send it over to you…
The choice is yours…
Don’t forget…
Right now, you can grab this whole course for only $20…
Happy sanding…
Peace,
Jason