If you’re thinking about staining redwood decking, then this guide will show you everything you need to know…
Let me explain…
The best way to stain redwood decking is by applying a semi transparent deck stain using a deck brush applicator with the Brush on, Brush off Method…
This is the ultimate way…
Now I know you didn’t just come for some little list, did you?
No…
You want all the gruesome details, don’t you??
Well, you, my fine friend, are in luck…
Cause I’m feeling extremely generous today…
For I, the self-proclaimed “Lord of the DIY Deck”, am going to lay out, step by step, everything you need to do to stain a redwood deck…
Buckle up, cause we’re going in…
Let’s get to it…
How to Stain Redwood Decking…
If you’ve read any of my other guides on staining decks, you’ll already know that I only ever stain a deck using a deck brush applicator…
And if you’ve never read any of my other guides then just know that I only ever recommend staining your deck with a deck brush applicator…
Capish??
Now for the staining technique…
When it comes to staining redwood, you want to make sure you only ever put on as much deck stain as your deck can absorb…
This point is criticall…
If you use water based deck stain and you apply too much, it will dry up on the surface of your deck very similar to a film or a layer of paint…
Then give your deck about 3 months and your “Film” will start to peel and flake off…
But if you use oil based and you apply too much stain then the outcome is very different…
Oil based won’t create a film on your deck but it will leave pools of stain that will forever be sticky…
You’ll have to drown your entire deck in methylated spirits just to remove all of the excess stain, and the tackiness along with it…
And we haven’t even mentioned the lap marks that could be all over your deck if you don’t do this properly…
That’s why I always recommend anytime you apply stain to a deck, make sure you use my infamous Brush on, Brush Off Technique…
The Brush on, Brush off technique allows you to lay down the perfect amount of deck stain…
That is only as much as your deck can absorb, and then it removes any excess so you don’t have any sections that will peel off or become tacky…
In fact, when you follow my staining process, the moment your stain dries, it won’t be the slightest bit sticky…
And, if you follow my process to a tee, you won’t have any sign of lap marks…
Look, it’s extremely hard to show you by typing on these keys, you really need to see it live in action…
Want to See These Deck Staining Techniques in Action?
Check out my step by step videos and guide by Clicking Here…

The best way to describe the staining process is like this…
- First you start by brushing on to coat your deck boards…
- Then you brush off to remove any excess stain…
- Then you simply repeat across your entire deck until it’s all coated…
And make sure you only stain 2 boards at a time…
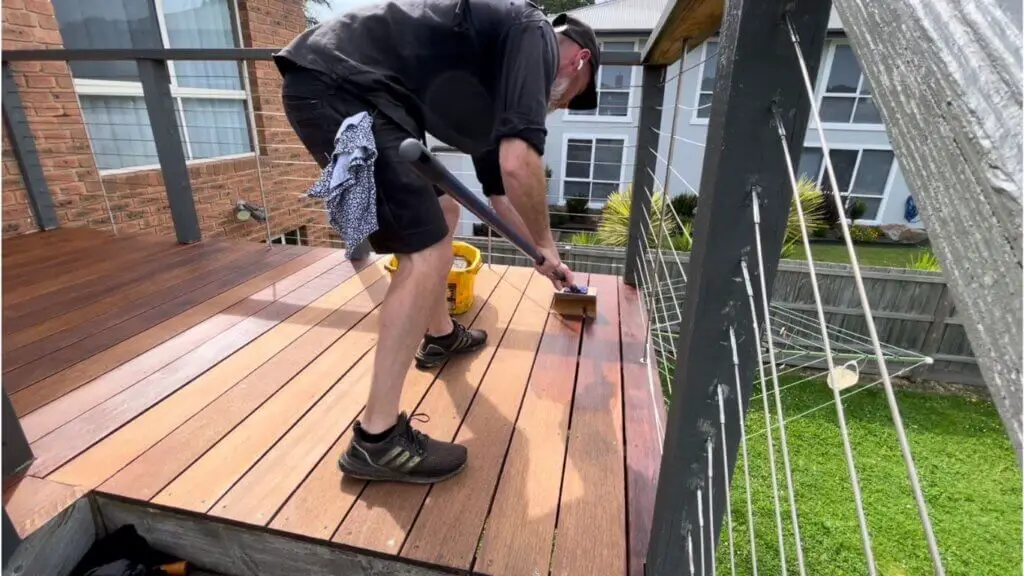
That’s me in the pic above…
Hey, eye’s on the decking!!
Anyway…
See how I’m only staining two boards?
That’s the only way I want you to stain your redwood decking, ok?
These are 140mm wide boards…
And as you can see, the deck brush is just a flick wider than the board…
So it’s impossible to stain just one board at a time…
That’s why we do two boards at a time…
Now, if you have narrow boards that are around 90mm wide then maybe you can do 3 to 4 boards at a time…
But for wider boards, stick to only 2 boards…
The idea is to cut in 2 boards and then stain the entire length of those 2 boards…
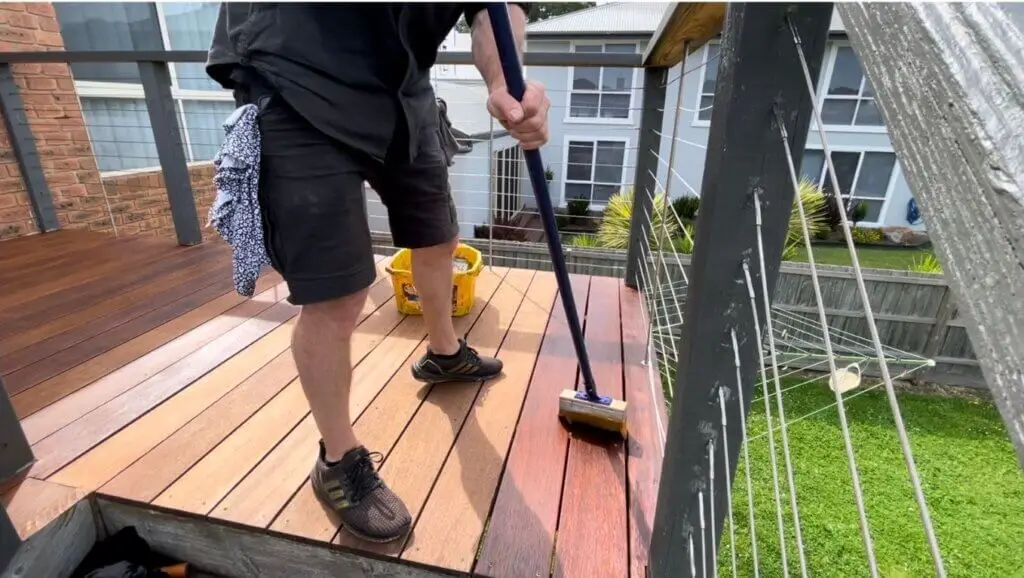
So you start at 1 end, brush on and brush off for the entire length of the boards and then cut in at the other end…
Once those 2 boards are done, then and only then can you move onto the next 2 boards…
Keep going, 2 boards at a time, brush on, brush off until your whole deck is complete…
And that’s the whole method from whoa to go…
Look, if you want me to go into more detail, and show you the Brush on, Brush off Technique, step by step, then you should pick up a copy of my guide…
I break it down step by step with full descriptions and even link out to videos of me showing you how too do it properly…
Anyway, you can find out more by clicking this link here…
But before you get all excited and start staining your redwood deck…
If you make these mistakes, your deck could peel…
Click here to find out how to avoid the Dreaded Peeling Deck!

Never break the two board rule when staining redwood…
Never ever, ever, ever, ever, break this rule
I’ve seen so many deck staining ventures turn bad because the stainer didn’t follow this 1 golden rule and they left so many lap marks that it looked like their deck was finger painted by a preschooler…
So only ever stain 2 boards at a time…
Ok?
Now that we’re on the same page, let me tell you that there is going to be a time when you’re gonna need to stain 3 to 4 boards at a time…
I know what I said but just listen…
The only time you can break this 2 board rule is if you have narrow boards or when you are doing your last few boards…
You see, two boards aren’t wide enough to walk on and slide your bucket on without stomping all over your fresh stain…
So as you come to the last few boards, you’ll need to stain 3 to 4 boards at the same time…
Like this…
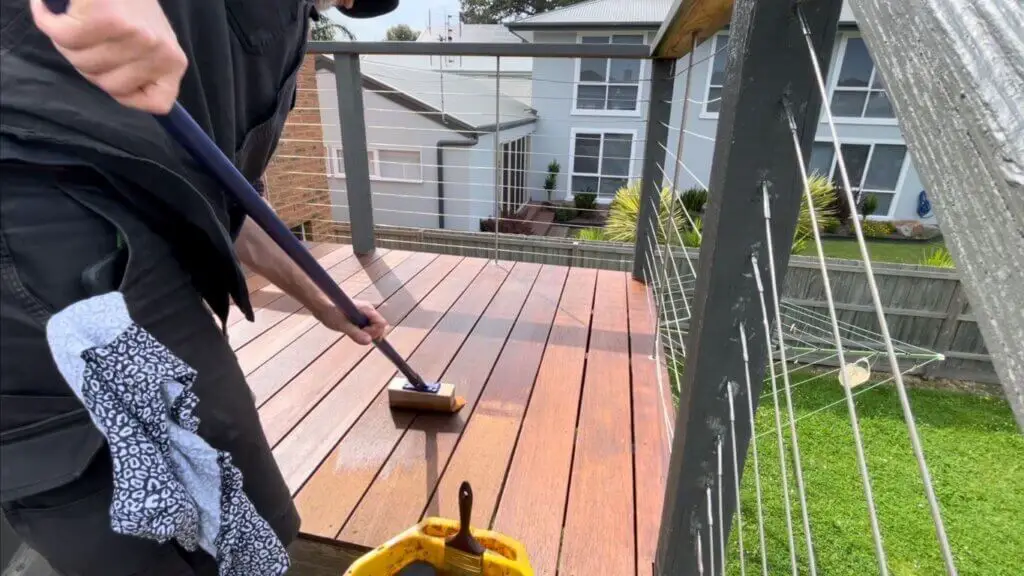
See how three boards are wide enough for me to work on?
Two boards just won’t cut it…
If I only left 2 boards to finish on, I’d be stomping all over the other boards I just stained…
So this is the only time I want you to break the 2 board rule…
But I don’t want you to get ahead of yourself…
You can’t just start staining redwood decking and think everything is going to work out…
There’s a few things you need to do before staining…
Before you get to staining redwood, you need to make sure it’s ready for stain…
Before you start slapping stain onto your redwood deck, you need to make sure that it’s open to absorb the stain…
You see, if you have a new redwood deck, then you need to let it weather for at least 3 months…
Yep, it’ll start to darken up…
It could even turn grey, but don’t panic…
There’s this magic little product called a deck brightener and it will take away all of that 3 months worth of darkening and bring back those beautiful pink colours that you fell in love with…
Now, don’t even think about skipping the weathering process and staining your deck straight away…
I know, it’s tempting but a new deck has all of these tannins and it’s soaked with moisture from the production process…
And all of this needs time to come out of your redwood…
3 months to be exact…
If you stain before the 3 months are up, don’t blame me when your deck peels and flakes within a couple of months…
You see, if your deck is too wet, the stain can’t absorb into your decking boards…
The stain sits on the surface and then eventually peels and flakes off…
Make sense?
Ok, great…
But how do you know if your redwood deck is ready for stain?
Easy…
How to Sand a Deck Step by Step…
Warning! Don’t sand your deck until you see this…
Click Here…

How to tell if your new redwood deck is ready for stain…
Have you heard of the water beading test?
Don’t worry, it sounds complex but it’s easy peasy…
It’s just 3 simple steps…
- All you need to do is grab some fresh water…
- Drip some on your deck
- Does it soak in or bead up on the surface?
That is all there is to it…
If the water beads up on the surface, your deck boards aren’t ready for stain just yet…
Give it another month and then test again…
If the water soaks in, you’re got the all clear to start staining your redwood deck…
Make sense?
Now if you have an old Redwood deck, don’t sit there all smug thinking you’re better than the new Redwood folks…
You too have some steps you need to complete before you start sloping deck stain all over your decking…
Waiting 3 months isn’t on the cards for you but…
You have the opposite problem…
You need to get your decking back to looking new again…
But how are we going to perform this little miracle and reverse years of ageing on your redwood deck??
Easy, you need to go through a very strategic deck cleaning process…
And wouldn’t cha know it…
It’s the exact same process that you “new redwood deck” peoples need to go through once your deck is ready for stain…
The very important, but oh so simple, cleaning process before staining redwood decking…
What you wanna do is grab yourself a really potent deck cleaner…
Here’s two that I personally recommend…
Choose one of the cleaners above and when you get over to their website, tell’em Jason sent ya…
Doing so won’t do you any good but it could confuse the heck out of the company reps so that could be funny…
Anyway, this isn’t the time or place to dive deep into each of these deck cleaners…
I’ve already done that in this very thorough deck cleaner article…
So if you want more information, head over there now…
This guide is more about the “how to”…
So that’s what we’re gonna focus on, ok?
Step 1.
Ok, this is very simple so don’t think it’s critically important…
First you need to scrub your deck with a deck cleaner…
And yes, deck cleaner is necessary…
So start by wetting your deck down with the garden hose…
Then mix your deck cleaner into a bucket at a ratio of 4 parts water to 1 part deck cleaner…
Then get to scrubbing with a firm bristle deck brush…
Anyway, let the cleaner sit on your deck for, oh, I don’t know…
Maybe, 15 minutes…
But…
And this is a HUUGGE but…
Make sure the cleaner never dries on your deck…
Keep it wet with a light spray from your garden hose…
Once your 15 minutes are up, pressure wash that cleaner right off your deck…
Oh, hang on…
That’s step 2…
Opps!!
Let’s fix that…
Step 2…
Pressure wash that deck cleaner right off your deck…
Keep in mind that you aren’t stripping your deck with the pressure washer…
The cleaning product will do most of the heavy lifting…
All you’re doing is washing the cleaner, as well as the dirt and grime, off the surface of your deck…
So you don’t need anything fancy in the way of a pressure cleaner…
Something cheap and easy like this pressure washer here will do just fine…
Once that’s sorted, we’re ready for step 3…
Step 3…
You may notice that after you use a deck cleaner on your redwood decking, it could be a little bit dark…
It could even be black in some sections…
This isn’t the time to panic…
Pull yourself together man!
All you need to do is scrub your deck with a deck brightener and all of that “blackness” will be gone…
Your redwood deck will be light and pink just how you remember it…
Sound good?
You ok now??
Awesome…
Now let’s look at a couple of brighteners that I recommend…
The first one is Equisol Vitalise…
From none other than Equisol…
I think the name may have given it away…
And the second brightener I recommend is Wood brightener by Defy…
The brand you choose isn’t too critical, as long as the brightener you use has oxalic acid in it, you should be fine…
If you think the product is weak, just mix less water with it…
Capish??
Now that you have your brightener in hand, mix it up at a ratio of 4 parts water to 1 part brightener…
Then scrub it all over your deck and watch the magic happen right before your eyes…
You’ll instantly start to see the colour come back into your deck…
If you think some spots are still too dark, make a stronger mix of oxalic acid and see if that makes a difference…
Cool, now for step 4…
Step 4…
You probably guess it by now but the next step is to pressure wash the brightener off your deck…
It’s the same process that you used for step 2…
You know, pressure washer??
Spray the surface of your deck??
Ringing any bells???
It does??
Goodie…
Let’s move on…
Step 5…
Step 5 is the easiest step of all…
It may test your patience but it’s easy to do…
You ready for this?
What you wanna do now is…
Walk over to your pressure washer…
See the connection where the hose connects to the machine?
Are you following?
This is really important, so don’t mess this up…
What I want you to do is grab onto the end of the hose and then trace it back to the tap…
You did that?
Great…
Now what I want you to do is…
Make sure the tap is off…
Cause the next step is to let your decking dry off and you don’t want any water coming from your hose or tap spoiling this drying process…
Ya feeling me??
When staining redwood, you want to make sure that the deck is completely dry so the stain can absorb into the timber properly…
This could take 1 to 2 days depending on the weather…
Once the deck is dry you can get to staining…
Now you’re ready…
Just go back to the section above where I explained to you how to stain your redwood deck and get to staining…
That’s all there is to it…
Honestly, this is a simple process…
As long as you follow the steps and don’t try to skip anything, your deck will look fantastic once you’re finished…
But before I go, there’s one more thing I need to tell you about staining redwood decking…
The most critical factor to having a deck that not only looks great but also stays looking great for years to come is a crazy concept called, Decking Maintenance…
No matter how well you follow the steps above, the only thing you can guarantee is that eventually your deck will either peel, flake or fade…
But you can stop this from happening if you apply consistent deck maintenance…
So don’t get fooled into thinking that your deck stain will last forever…
It won’t…
But if you do want it to look fantastic for 10 plus years, the only magic formula I know is annual deck maintenance…
And with that, I’m done…
I’ll see you on the next episode…
Peace,
Jason…
Need some Expert Advice?
If you’ve been searching the internet trying to find an answer to a specific deck problem and you’ve found it impossible to get a straight answer…
Why not just reach out and ask me directly for an answer?
I’ve got 10 years of deck knowledge crammed into my noggin. I can pretty much guarantee I’ve got an answer to your problem just rattling around in there…
Click the button below to find out more…
0 Comments