The most effective way to sand a deck in 2026 is to start by stripping the damaged surface back to bare timber with a belt sander equipped with 36-40 grit sand paper, then smooth it off with 80 grit sandpaper on an orbital sander…
That’s all there is to it…
But, if you’re worried that you may permanently damage your deck by etching divots and deep scratches that can’t be removed…
Or if you’ve tried to sand your deck and you quickly found out that your deck has cupping so the sander is struggling to remove the old stain and weather damage…
Then this guide will show you exactly how to sand a deck safely, without the risk of damaging your boards while removing every last inch of old stain or weather damage even if your deck boards are cupped and twisted out of shape…
Here’s what you need to know…
Before You Sand a Deck, This is What You Need…
- The Deck Sanding Tools You Need…
- The Belt Sander I recommend for Stripping Old Stain and Damage to Your Deck…
- The Orbital Sander I recommend for Smoothing a Deck Ready for Stain…
- Use a Detail Sander to Get The Edges and Hard-to-Reach Spots…
- Choose The Right Sandpaper Grit For Your Deck Sanding…
- How much sandpaper do you need for your deck?
The Step by Step Deck Sanding Process…
- Make sure your deck is clear from dirt and debris…
- Punch down the nail or screw down the screws before sanding…
- Sand the deck with a belt sander and 40 grit sandpaper…
- Sand the edges with an orbital sander…
- Sand the tight sections with a detail sander…
- Sand and smooth the deck with the orbital sander and 80 grit sandpaper…
- Vacuum the dust from the deck…
Other Deck Sanding Techniques To Make it Easier…
- Here’s a couple of deck sanding techniques that’ll make your deck sanding a whole lot easier…
- Sanding a deck is hard work…
- How about sanding a deck with a floor sander?
- I used an Orbital Floor Sander to sand a deck and this is the results…
- How to use a drum sander on a deck…
- Now you know how to sand a deck, what’s next?
The Deck Sanding Tools You Need…
You don’t need a lot of equipment if you want to sand your deck boards but there are some tools that you can’t live without if you want that professional finish…
- A belt sander
- An orbital sander
- Detail sander
- Sanding belts
- Sanding discs
- Impact driver
- Hammer
- Nail punch
- Ear muffs
- Dust mask
- Knee pads
- Industrial Vacuum cleaner
Before you get into sanding your deck, you really need to make sure you have the best sander for deck refinishing…
So let’s get into that right now…
The Belt Sander I recommend for Stripping Old Stain and Damage to Your Deck…
I sand multiple decks each and every week, so I’ve tried a bunch of different deck sanders over the years…
And easily, the best deck sander is definitely the Makita 9403 Belt Sander…
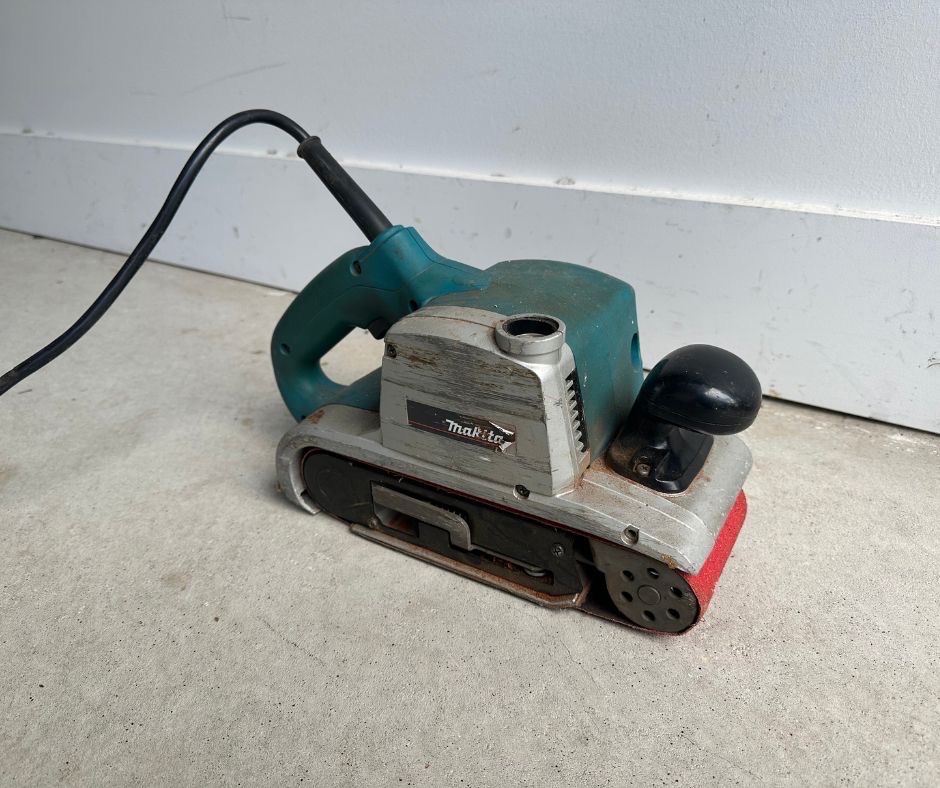
This is the deck sander that I personally use…
The Makita 9403 allows you to strip the old coatings off your deck especially if you have slight cupping on your decking boards…
The belt sander is big enough to sand the deck boards but small enough to work the uneven boards…
This is pretty critical when it comes to sanding a deck…
Using a belt sander to sand your deck allows you to sand those sections of the deck that a big drum sander would miss…
If you have any type of cupping, and most decks do, you can employ my “Round House Method” to easily get those hard to sand sections…
Oh, you don’t know what the Round House Sanding Method is?
Don’t worry, I’ll go into that a bit later. All you need to know is that my special sanding techniques work so well with the 9043…
That’s why the Makita 9043 Belt Sander is the best sander for deck refinishing…
Now as great as the Makita 9403 is at sanding a deck, you’ll still need two other sanders for your deck sanding…
You’ll need an orbital sander to sand the edges and to smooth your deck…
And you’ll also need a smaller detail sander to get into those tight corners…
Let’s have a look at the orbital sander I use for deck sanding…
The Orbital Sander I recommend for Smoothing a Deck Ready for Stain…
I recommend getting an orbital sander like this Metabo SXE-450 Turbo…
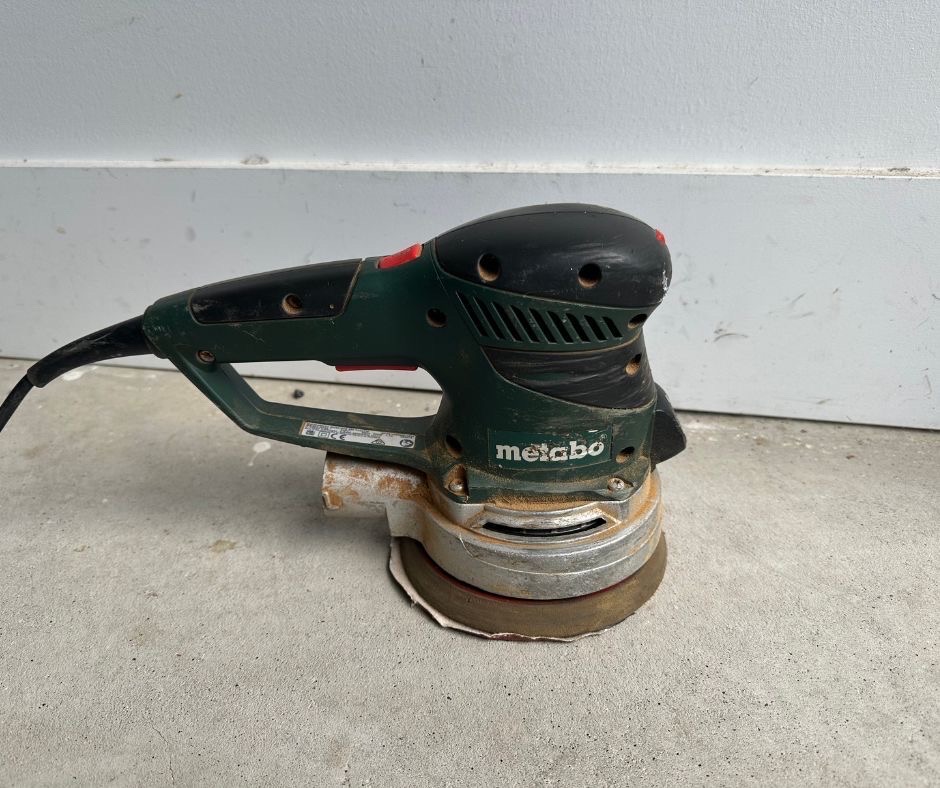
This is the orbital sander that I use for sanding the edges and smoothing the deck…
An orbital sander like the Metabo is great because it has a 150mm sanding plate which makes it more stable when you’re sanding your deck…
The smaller 100mm sanders have a tendency to tip over and damage your deck…
And when you sand your deck using the special techniques that I use, this sander allows you to stay in control and not cause any damage to your deck…
One thing to keep in mind is a sander like this will get damaged when you use it on an uneven surface like a deck.
The good news is it’s only the pad that will become damaged and it’s really easy to replace and also quite cheap…
You can pick up a replacement pad from Amazon…
The thing is, a sander like this is perfect for my High Skii Sanding Technique…
This technique allows you to get into those uneven boards without having to level your deck and thin it down with the massive deck sanding machines…
Usually, the only way to sand a deck is to level it first and then sand it…
You could be taking off 3 to 5mm and causing your deck timbers to become weak and unsafe to walk on…
But a sander like this used with my trade secret sanding techniques, you’ll be able to sand your deck without making it weak and unsafe…
The larger plate makes it so much easier to control and you don’t have to push down as hard while you’re sanding…
This model also has a variable speed and a turbo switch to sand the deck even quicker…

I always sand decks in turbo mode and this sander just eats it up…
I have tried cheaper orbital sanders in the past and they burn out when doing the larger decks…
I’ve sanded well over 200 decks with the Metabo SXE-450 orbital sander and it’s never missed a beat…
Ok, now let’s look at sanding in those tight corners…
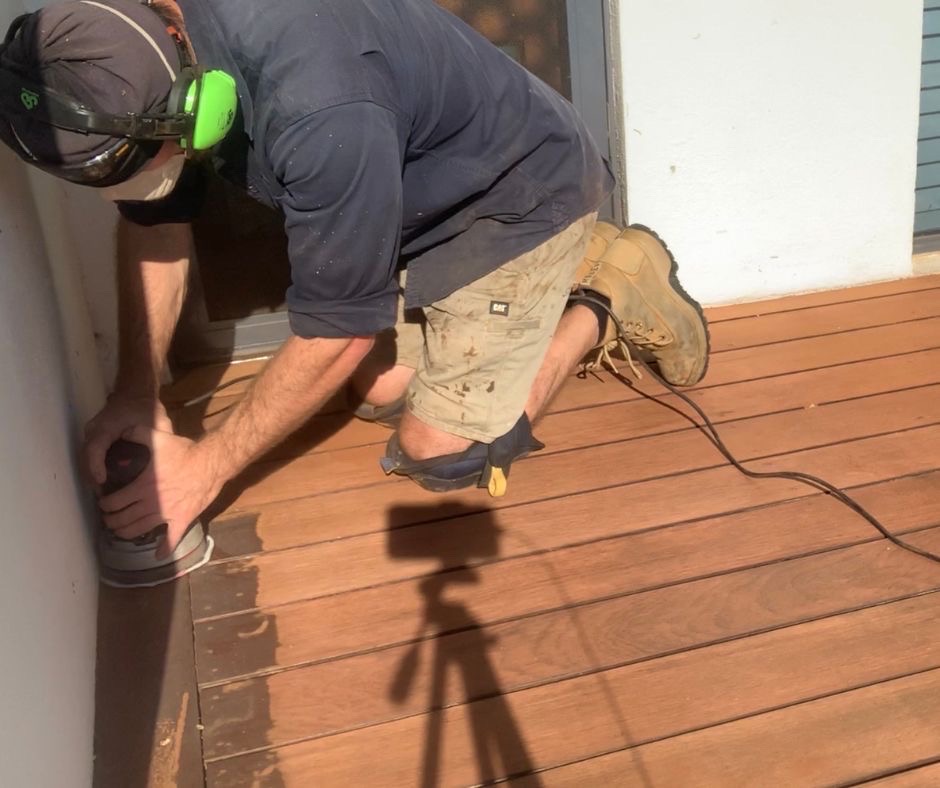
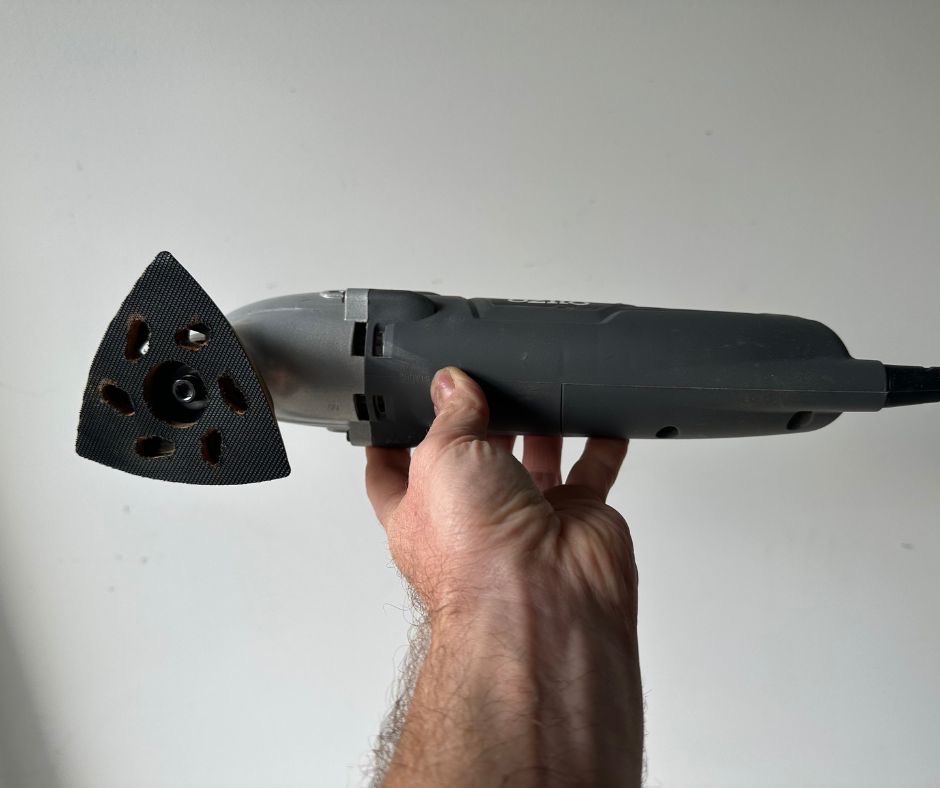
Use a Detail Sander to Get The Edges and Hard-to-Reach Spots…
To complete your deck sanding, you’ll need to get yourself a detail sander…
I use a Multi Tool with the sanding pad installed…

In all honesty, you can get away with a cheap detail sander because it will only be sanding very small sections of your deck…
I use this sander to get into those tight edges…
The thing to know about these sanders is that you can abuse them and they keep going.
The accessories are another story…
They don’t last very long at all so make sure you grab yourself a replacement sanding pad like this sanding pad here…
Once you’ve got your sanders, you’ll need to make sure you get the right sandpaper for sanding a deck…
Let’s get into it…
Choose The Right Sandpaper Grit For Your Deck Sanding…
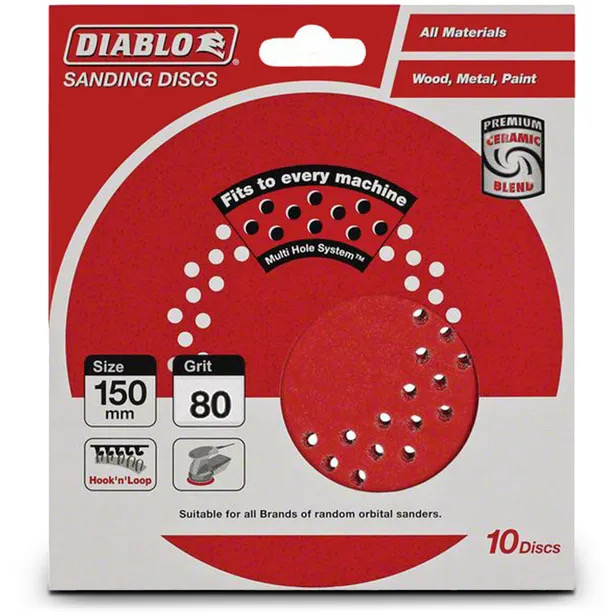
To sand a deck properly, you’ll need a combination of 40 grit sanding belts for stripping and 80 grit sandpaper discs for smoothing off…
You start off by sanding your deck back to bare timber with a 36 or 40 grit sandpaper…
This is where a lot of homeowners get a little scared…
People think that if you use a 36 to 40 grit sandpaper that you’ll chew up your decking boards and completely destroy it…
The truth is, as long as you have hardwood timber, you won’t…
If you’re sanding a treated pine deck then go with a 60 grit sandpaper but to sand any type of hardwood deck, you’ll want 36-40 grit on your belt sander to strip it back…
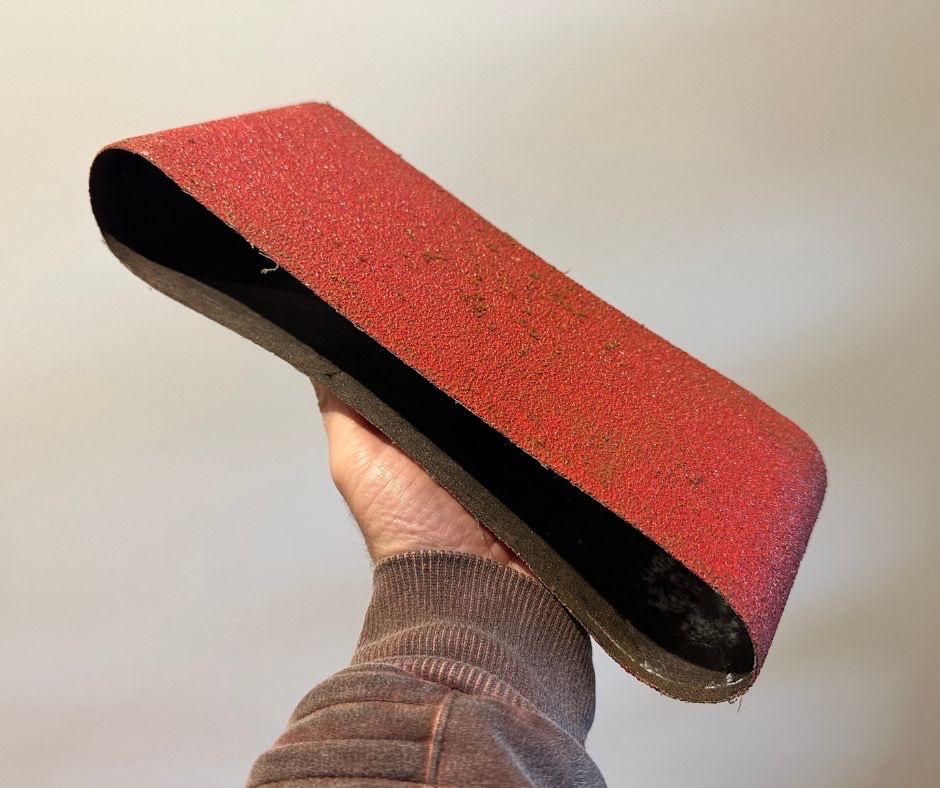
So get yourself some quality sanding belts like these Diablo sanding belts…
Once you’ve sanded away all of the old stain and weather damage, then you’re ready to smooth off with 80 grit sandpaper…
This is to smooth the deck before painting or staining…
For this, you’ll want some 80 grit sandpaper discs like these from Diablo…
Never go finer than 80 grit sandpaper when sanding a deck…
If you go too fine with your sandpaper, it closes the surface of the timber and the oil or stain you use can’t penetrate the deck boards properly…
Sanding your deck with 80 grit gives it the balance between smoothness without closing off the surface…
It’s the perfect environment for the deck stain to be absorbed…
Don’t listen to what those guys at the hardware store say…
They don’t know what they don’t know…
I have nothing against them but If they knew how to sand a deck properly, they wouldn’t be working at the hardware store…
Stick with the 80 grit sandpaper and give your deck stain the best chance to absorb into the boards…
You’ll also need 80 grit sandpaper sheets to match whichever orbital sander you have and hit the edges with the 80 grit as well…
How much sandpaper do you need for your deck?
A packet of 5 sanding belts will get you 5 metres squared of sanding…
Don’t try to skimp on the sanding belts and use them longer than you need too…
Do you want a thousand dollar quality finished deck or do you want to save $20 on sanding belts?
Divide the square metres of your deck by 5 and that’s how many packets of 40 grit sanding belts you’ll need…
Spend the extra money, you’ll thank me later…
And for the sanding discs, you’ll need to use around 1 packet of 10 discs for each 10m2 of decking…
So work out how many m2 your deck is and then divide that by 10…
For example…
100m2 deck divided by 10 = 10.
So you’ll need 10 packets of 10 sanding discs for a 100m2 deck…
Make sense?
Now let’s get into how to actually use these sanders properly…
The 7 Steps to Sanding a Deck Like a Pro…
Now that you’ve got the equipment you need, let’s get into the actual step of sanding a deck…
1. Make sure your deck is clear from dirt and debris…
We want to make sure that all of the dirt and stones are all swept off your deck…
The reason is, if you start to sand your deck and your sander runs over stones or debris, you can shred your sanding belts to bits…
So make sure you sweep your deck first before you start sanding…
That’s pretty straight forward so I think we’ll move onto step 2…
2. Punch down the nail or screw down the screws before sanding…
This part of sanding your deck can be a real pain in the you know what but it’s completely necessary…
If you sand your deck with the nail sitting up, you’ll sand the head straight off the top of your nails or you’ll chew up your sanding belts and make the job really hard for yourself…
So grab your nail punch and knock down each nail until it sits just below the surface of your decking boards…
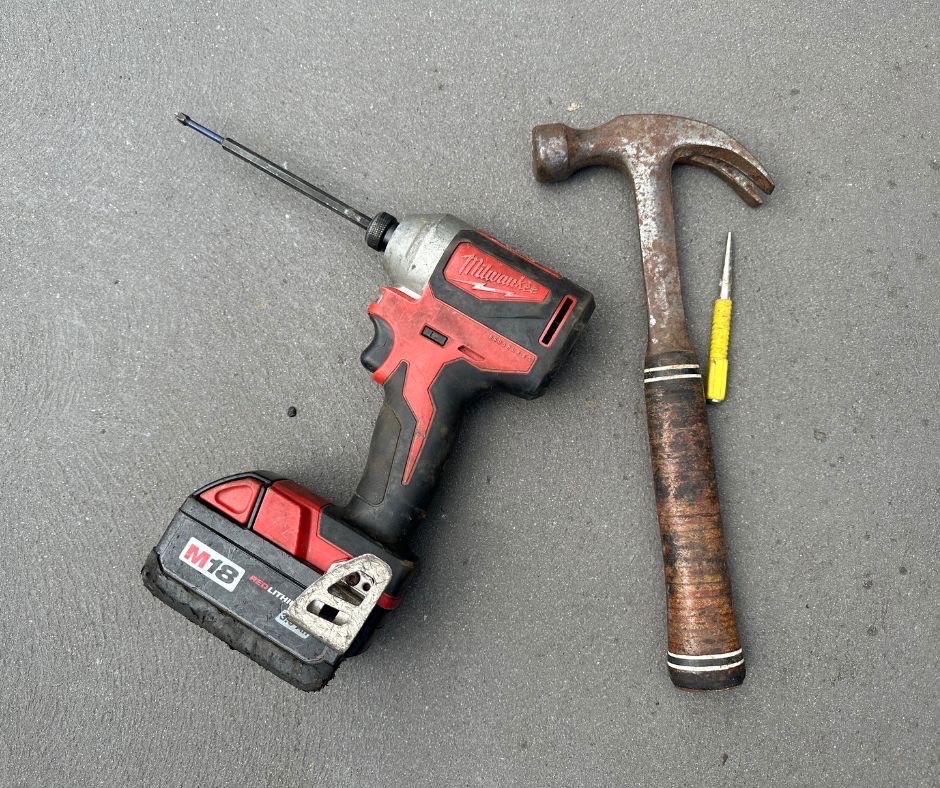
Now, if you have deck screws, you’ll need to use an impact driver and the right drill bit to fit the head of your deck screws…
I use the Milwaukee brushless impact driver…
Then go around and drive each screw just below the surface of your deck…
If the screws aren’t driving down, the best thing to do is to drive the screws out a little bit first and then drive them back in…
That’s the best way to do it without destroying the heads on your drill bit or the head of your screws…
Another thing to keep in mind with your nail punch, you want to get the punch to be just smaller than the head of your nail…
If it’s too big, you’ll make big holes in your deck…
And if it’s too small, you’ll damage the head of the nail…
I recommend getting a nail punch set so you can test the different sizes and get the right one…
So make sure you get the right size for your nail head…
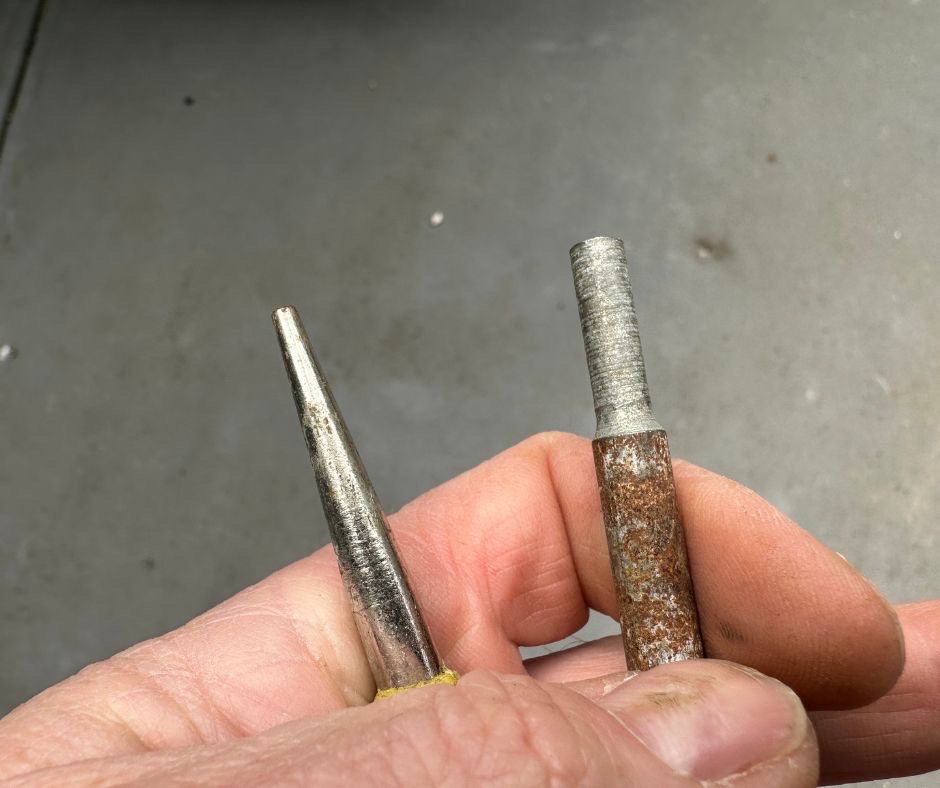
I normally use a thicker punch when I sand a deck…
Once you’ve done every nail or screw on your deck, it’s time to start sanding…
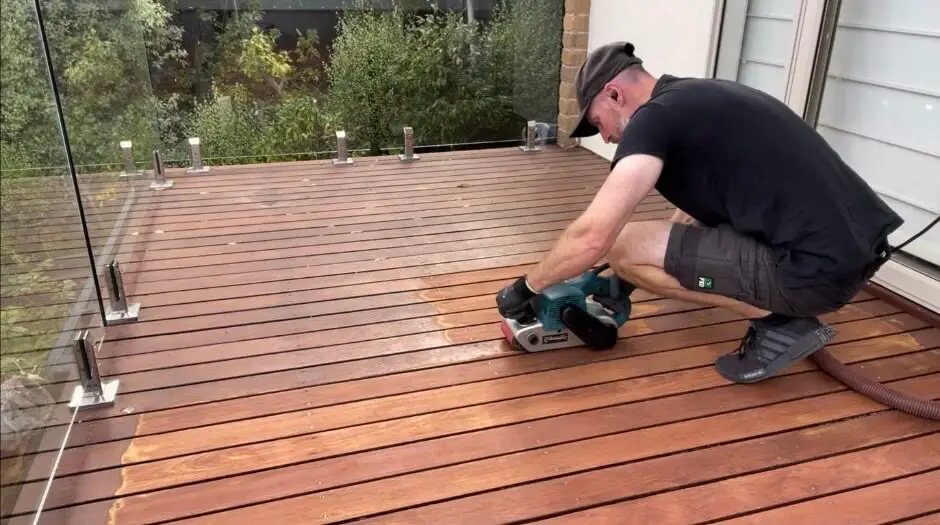
3. Sand the deck with a belt sander and 40 grit sandpaper…
It’s pretty easy to learn how to sand a deck with a belt sander…
First you want to make sure you know how to turn it on and lock it so you can let go of the trigger…
If you hold the trigger for a long period, your forearms will be screaming at you so pay attention, I’ll show you how easy it is…
See this here…

This is the trigger you pull to start the belt sander…
While you’re pulling the trigger, click this button down…
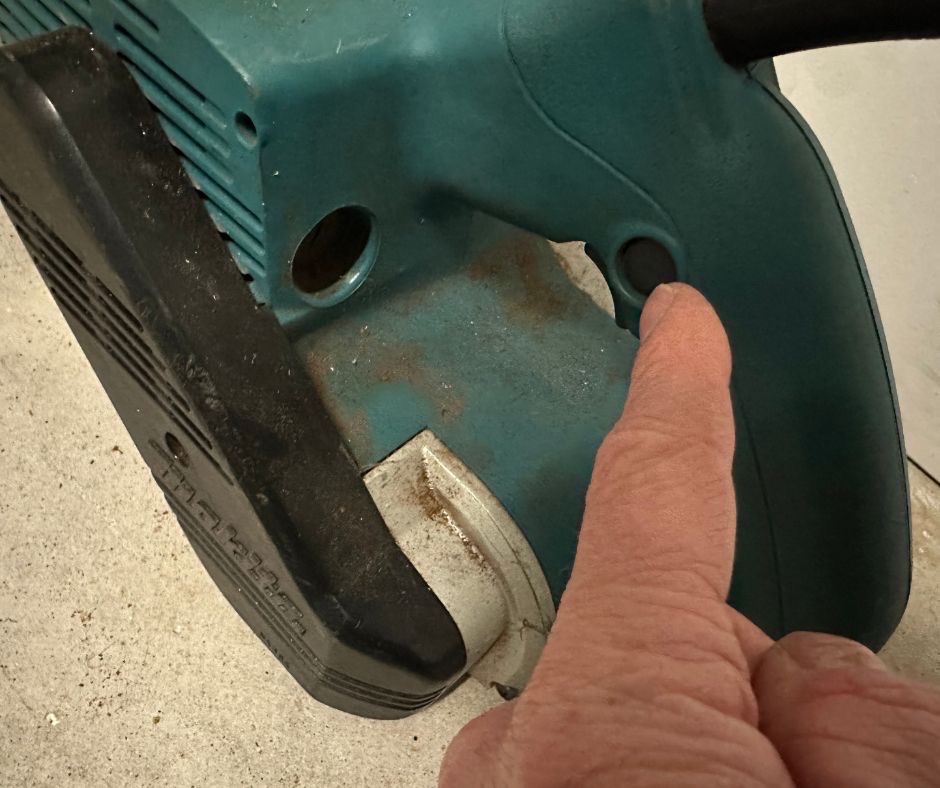
That’s the lock to keep the belt sander running even after you release the trigger…
Now let’s install the sanding belt…
Make sure the sander is off and then pull this lever out like this…
This allows you to slide the sanding belts on and off…
Now slide the sanding belt into place like this…

And push the lever back into place to lock the sanding belt in…

The next step is to make sure the belt is running in line with the sander so what you want to do is, hold the sander up and pull the trigger…
You’ll see the belt start to move into place…
The belt should line up with the slip pad like this…
If it’s not lining up then you need to turn this knob here until you get it to line up…
This knob here…
Now you’re ready to start sanding your deck…
Make sure the belt sander is off and not spinning then place it flat on one of the deck boards…
When you pull the trigger, the belt sander will try to run forward…
You just need to make sure you’re holding it by this handle and it won’t go anywhere…
Lock the trigger in then place your other hand on the handle…
You want to work the sander up and down the length of the boards, and not across…
The sander will do most of the work but you can apply a little pressure downward to help it out a little…
It’s usually at this point that you discover sections of your deck are actually uneven and warped out of shape…
This makes removing all of the old stain and surface damage an almost impossible job…
The thing is, even if your boards look flat and even, they usually aren’t…
Think about it…
Your deck sits outside in the rain and sun, with the constant wetting and drying, expanding and contracting…
Don’t panic, this is the case in 9.9 out of every 10 decks that get sanded…
I come across this everyday…
That’s why I created my very special RoundHouse and High Skii Techniques to get the sander to reach inside the cupping and to get into all of those low spots without damaging your decking boards…
Before I discovered my method, it was almost impossible to properly sand the middle section and low spots…
And if you don’t sand your deck properly, the colour will look dirty or possibly patchy once you stain it…
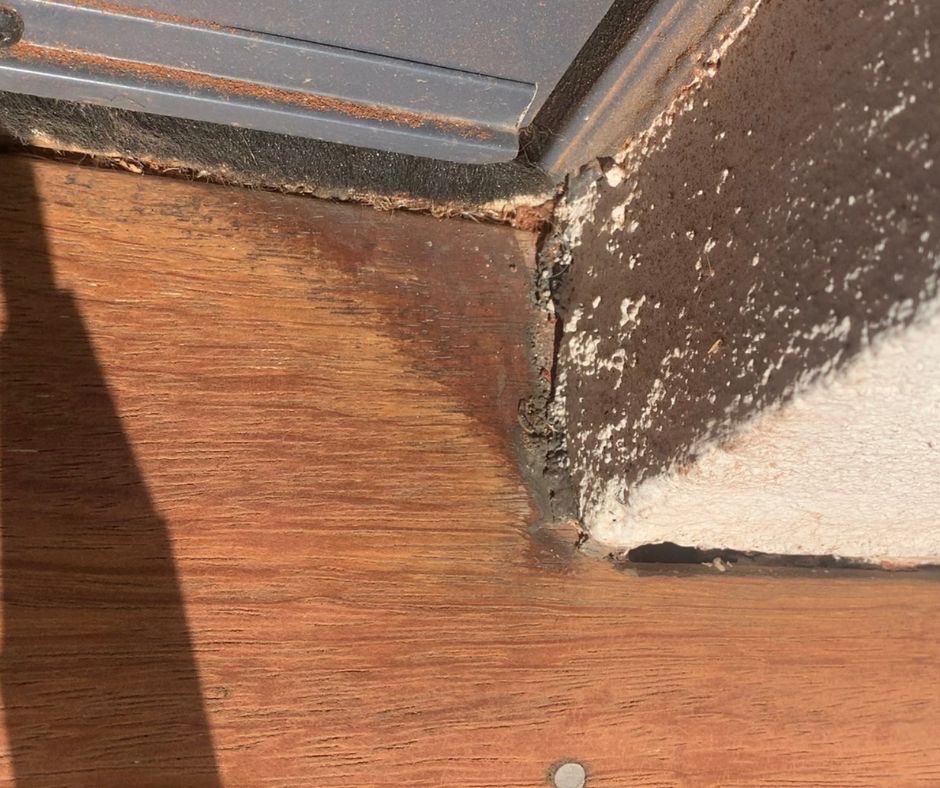
Check this out…
This is a customers deck after they attempted to sand it then applied a coat of stain…
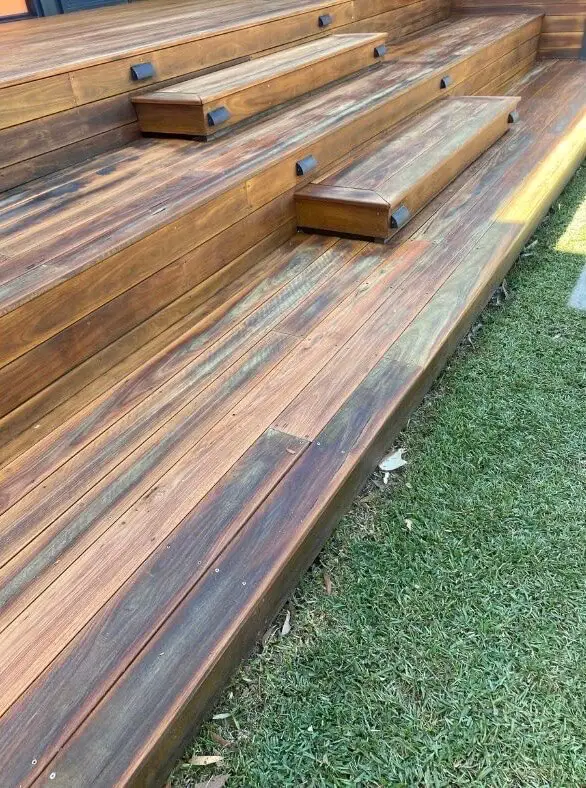
You can see how they weren’t able to sand the middle of the boards properly…
The sander couldn’t quite get in there…
They obviously didn’t know my RoundHouse Method or High Skii Technique…
And as you can see, a fresh coat of deck stain won’t hide a bad sanding job…
Now, as bad as this looks, the real problem is that the middle section of the boards won’t absorb the deck stain properly and it’ll peel and flake in those sections…
You need to make sure you get right into every cupped board, every warped and uneven section or your deck is peeling in a couple of months…
If you want me to show you how to sand your deck properly, grab yourself a copy of The RoundHouse Method and High Skii Technique, and I’ll show you what you need to know…
Once you’ve got the technique down properly, just keep going until you’ve completely sanded and stripped the deck back to raw timber…

Did you notice that I couldn’t get to the edges with the belt sander?
That’s why we have step 4…
4. Sand the edges with an orbital sander…
This is where you use your orbital sander with the 40 grit sanding discs…
The idea is to keep the sander flat to the deck and work it around until you remove the old coating from your deck…
Just keep sanding until all of the edges are sanded back…
If you come across any sections that are uneven, you’ll quickly realise that keeping the sander flat, just an’t gonna cut it…
That’s why I created the High Skii Sanding Technique…
You just need to be careful, because if you do this wrong, you could etch divots into your decking…
Once the bulk of the sanding is done, you’ll come across some sections that you can’t sand with the orbital sander…
This is why you also need your detail sander…
5. Sand the tight sections with a detail sander…
Use the detail sander to get into the tight corners…
You can move the disc around to make it easier for yourself to get right into the corners of your deck…
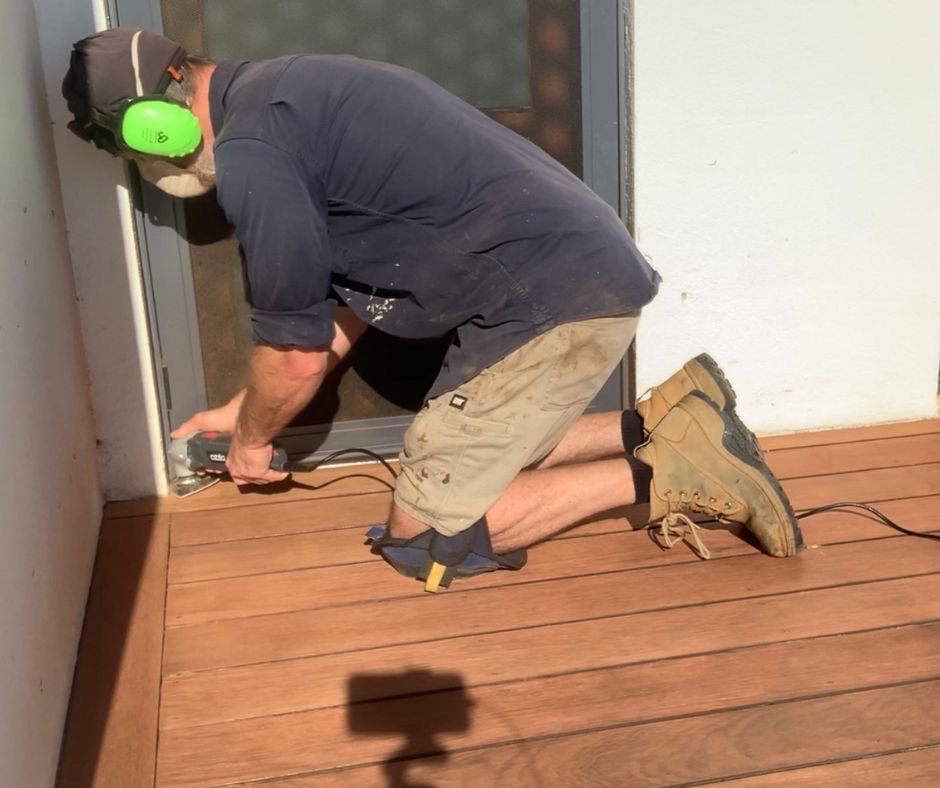
When it comes to the detail sander, I prefer to use an 80 grit sandpaper instead of the 40 grit…
The 40 grit sandpaper seems to scratch the deck more than sand it, besides, with a small section of decking, it’s easy to sand with 80 grit sandpaper…
So now that you’re done with the detail sander, your deck should be completely sanded back to raw timber…
But we’re not finished yet…
We still have to smooth the deck before we call it a day…
6. Sand and smooth the deck with the orbital sander…
Now what we’re going to do next is to grab the orbital sander again but this time we’re gonna use the 80- grit sandpaper instead of the 40 grit…
The whole idea is to smooth the surface of the deck and remove any sections that we missed with the belt sander…
All you need to do is run the orbital sander up and down the boards until it feels smooth to touch…
Remember that your aim at this point isn’t to strip the deck back, it’s simply to smooth it off, so it shouldn’t be a hard job…
Run the sander up and down over each board and that should be all you need…
Now your deck should be completely sanded…
The only thing left to do now is to…
7. Vacuum the dust from the deck…
This step is pretty important if you have any intention of applying a deck stain or oil…
You can’t apply any type of deck coating if your deck is covered in dust…
So get out your industrial vacuum cleaner and treat your deck like it’s your living room and vacuum that sucker…
Make sure you vacuum between all of the boards and in all of the corners…
Do it properly, don’t act like a teenager and pretend you vacuumed…
Come on now…
We’re all adults here…
Ok good…
Now before you move on…
Here’s a couple of deck sanding techniques that’ll make your deck sanding a whole lot easier…
I’ve been doing this a loooong time…
Just over ten years to be exact…
Now, I know better than anybody how tough it is sanding a deck with the belt sander and orbital sander combo…
But I still do it this way, because it’s the best way to do it…
Here’s the thing…
For me to make any money in this business, I need a couple of things to happen…
I need to get the job done as quick as possible so I can move onto the next job…
And I also need the deck sanded back properly otherwise the finished deck will look blotchy and most likely peel within a couple of months…
And that’s bad for business..
In fact, if I was handing over blotchy decks that peel within a few months, I wouldn’t have a business…
But I’ve got a couple of secret weapons to make sure I get the deck sanded as quickly as possible and as thoroughly as possible…
It’s two very simple sanding techniques that I use together to sand back even the most bent out of shape decks you could ever imagine…
I get in there with my two simple techniques and I sand that decking back to bare timber in record time…
The techniques I use, cut through old deck stain like a knife through butter…
If I’m being honest, you can’t sand a deck back properly without using these techniques…
There’s always sections on your boards that can’t be reached properly with traditional sanding methods…
If your deck is cupped, uneven or has any type of warping, your sanders will not strip your decking back enough to absorb the stain properly…
That’s why I developed my very special sanding techniques…
I call them The RoundHouse Method and The High Skii Technique…
You may have heard me talk about them before…
Well, if you want to learn them for yourself, click the link above and I’ll show you what you need to know…
Sanding a deck is hard work…
Now, it’s at about this point that most homeowners start to freak out…
And I have to talk them off the cliff…
It goes a little something like this…
“I don’t know about this, this seems like a lot of work!!”…
“Isn’t it easier to hire a walk behind floor sander?”…
Ok, lets have a look at that now…
How about sanding a deck with a floor sander?
If you want to speed this up, you might be tempted to hire a floor sander to sand your deck…
In most cases, using a drum sander or floor sander to sand your deck is a bad idea…
The first reason is, even if your deck looks relatively flat, it usually isn’t…
And when you use a floor sander to sand a deck that isn’t perfectly flat, it won’t sand every part of the boards…
You’ll be left with half your board sanded and half your board not sanded…
Kinda like this…
The second reason is, most floor sanders aren’t designed to sand a deck…
And the moment you hit any type of deck nail or screw, you’ll damage the drum…
Wherever you hire your floor sander from will charge you to repair or replace the damaged floor sander…
So in most cases, don’t even consider using a floor sander to sand a deck…
Instead, learn my secret deck sanding techniques, and use a combination of the belt sander and an orbital sander…
Still not convinced?
Check this out…
I used an Orbital Floor Sander to sand a deck and this is the results…
The picture below shows the difference between an orbital floor sander and a belt sander when sanding a deck…

The left of the picture is the deck with no sanding…
The middle is the orbital floor sander…
And the right section is the Makita belt sander…
You can judge for yourself which sander works best…
Now with all that said, most of the professional deck restorers use a drum sander to sand a deck…
So it can be done and if you know what you’re doing, it could be an easier option…
It’s just not the best option, or the safest option or even the most cost effective option when you think that you could possibly weaken your boards to the point of needing replacement, but just in case you still wanna use a floor sander, this is for you…
How to use a drum sander on a deck…
If you’re planning on skipping all the hard sanding work and use a drum sander instead, then you’re not gonna like this…
The moment you start to sand your deck with a drum sander, you’ll instantly notice that the only stain isn’t coming off properly. There’ll be section of your boards that the sander just can’t get to…
The whole idea with a drum sander is to level your deck off first…
To do this you need to sand across your deck on a 45 degree angle…
Once it’s level, next you need to sand along the length of the boards…
This can be a tricky way to sand a deck if you don’t know what you’re doing, so I don’t usually recommend it…
Plus, this is the quickest way to weaken your deck boards by over sanding and taking too much off the top…
If you really want to use a drum sander, you can hire a drum sander without too much hassle but If I were you, I’d stick with the belt sander and orbital sander and pair that up with my special “RoundHouse Sanding Method” and the “High Skii Sanding Technique”…
That’s the best way…
Now you know how to sand a deck, what’s next??
Well my friend you did it…
Your deck is completely sanded and it’s ready for the next step…
Should you paint your deck or should you stain it?
What that step is, really depends on how you want your deck to look…
You can leave it and let it grey off, or you can give it a coat or 3 with deck oil or stain…
If you want to know how you can stain your deck check out my guide…
Just click the blue link above and I’ll take you straight to the guide…
But either way, that’s the topic of another blog post, not this one…
So I’m going to leave it right there…
I hope I’ve been able to answer all of your questions today about how to sand a deck…
That’s about all from me for today…
Peace,
Jason
FAQ’s
If you want to sand your deck fast, here’s what you need to do. Get a Makita 9403 Belt sander and some high quality 36 grit sanding belts. If you have a 25m2 deck then get any least 20 sanding belts. If you have lots of belts, you won’t have to keep sanding when the belts are worn down. If you sand a deck with worn out sanding belts, it can take twice as long…
The best sander for deck refinishing would definitely be the Makita 9403. The size allows you to sand those cupped deck boards. The power and the weight make it faster and easier than any other sander I’ve used to sand a deck…
Yes, you can definitely use a belt sander on a deck. Using a belt sander on a deck is one of the best ways to sand a deck. Just make sure you sand in the direction of the timber. Don’t sand across the deck or you’ll leave huge divest and scuff marks all over your deck…
If your deck is old and worn or if you have peeling deck stain then yes, you should sand your deck before staining. If you have pressure washed your deck and have raised timber fibres on the surface, then you will also need to sand your deck before staining. If you are simply restraining a stained deck then you won’t need to sand…
To sand your deck, use a belt sander with 36 to 40 grit sandpaper belts to strip and remove the old surface and deck coatings. Next you’ll need an orbital sander with 40 grit sanding discs to sand the edges of your deck. The tight spots will need to be sanded with a detail sander. Once your deck is completely sanded, use an orbital sander with 80 grit sanding discs to smooth your deck ready to stain. That’s how you sand your deck…
0 Comments